Our Services
Application Development
Blockchain and Web 3.0 Consulting
Smart Contract Development
Digital Transformation
Business Process Automation
Image and Natural Language Processing Solutions
Custom/Predictive Modeling and Analysis
IoT Security Solutions
IoT System Architecture Design
Microservices and Containerization
CI/CD Implementation
User Experience Research and Testing
User Interface Design
ERP System Implementation
Custom CRM Solutions
Managed Cloud Services
Cloud Migration and Consulting
Mobile Application Development
Web Application Development
How to build a robust video calling application with React Native - for iOS and Android

Introduction
The goal of this blog is to be a one stop documentation for developing a robust video calling application in react-native. It is written on top of the official documentation and blogs, to fill in the gaps that are left.
App Requirements and Libraries
First, let's take a look at the set of open-source libraries we'll be utilizing to establish the app's functionalities.
react-native-callkeep: This library will assist in triggering incoming calls on the device.
react-native-voip-push-notification: This library would be used to manage push notifications to iOS devices, as simply using Firebase notifications won’t be effective for managing VoIP calling (specifically on iOS devices when the app is in a terminated state).
react-native-twilio-video-webrtc: This library is used to establish communication with twilio programmable calling APIs to render video calling UI components. Alternatively, one can simply use any WebRTC based framework for this.
react-native-firebase/app: Firebase implementation of react-native.
react-native-firebase/messaging: This will be used to actually send the notifications.
Testing scenarios to test the flow of your VoIP application
Below is a pictorial representation of the use cases that your VoIP application has to deal with, so we can design code flow accordingly so we can cater to all possible standard use cases.
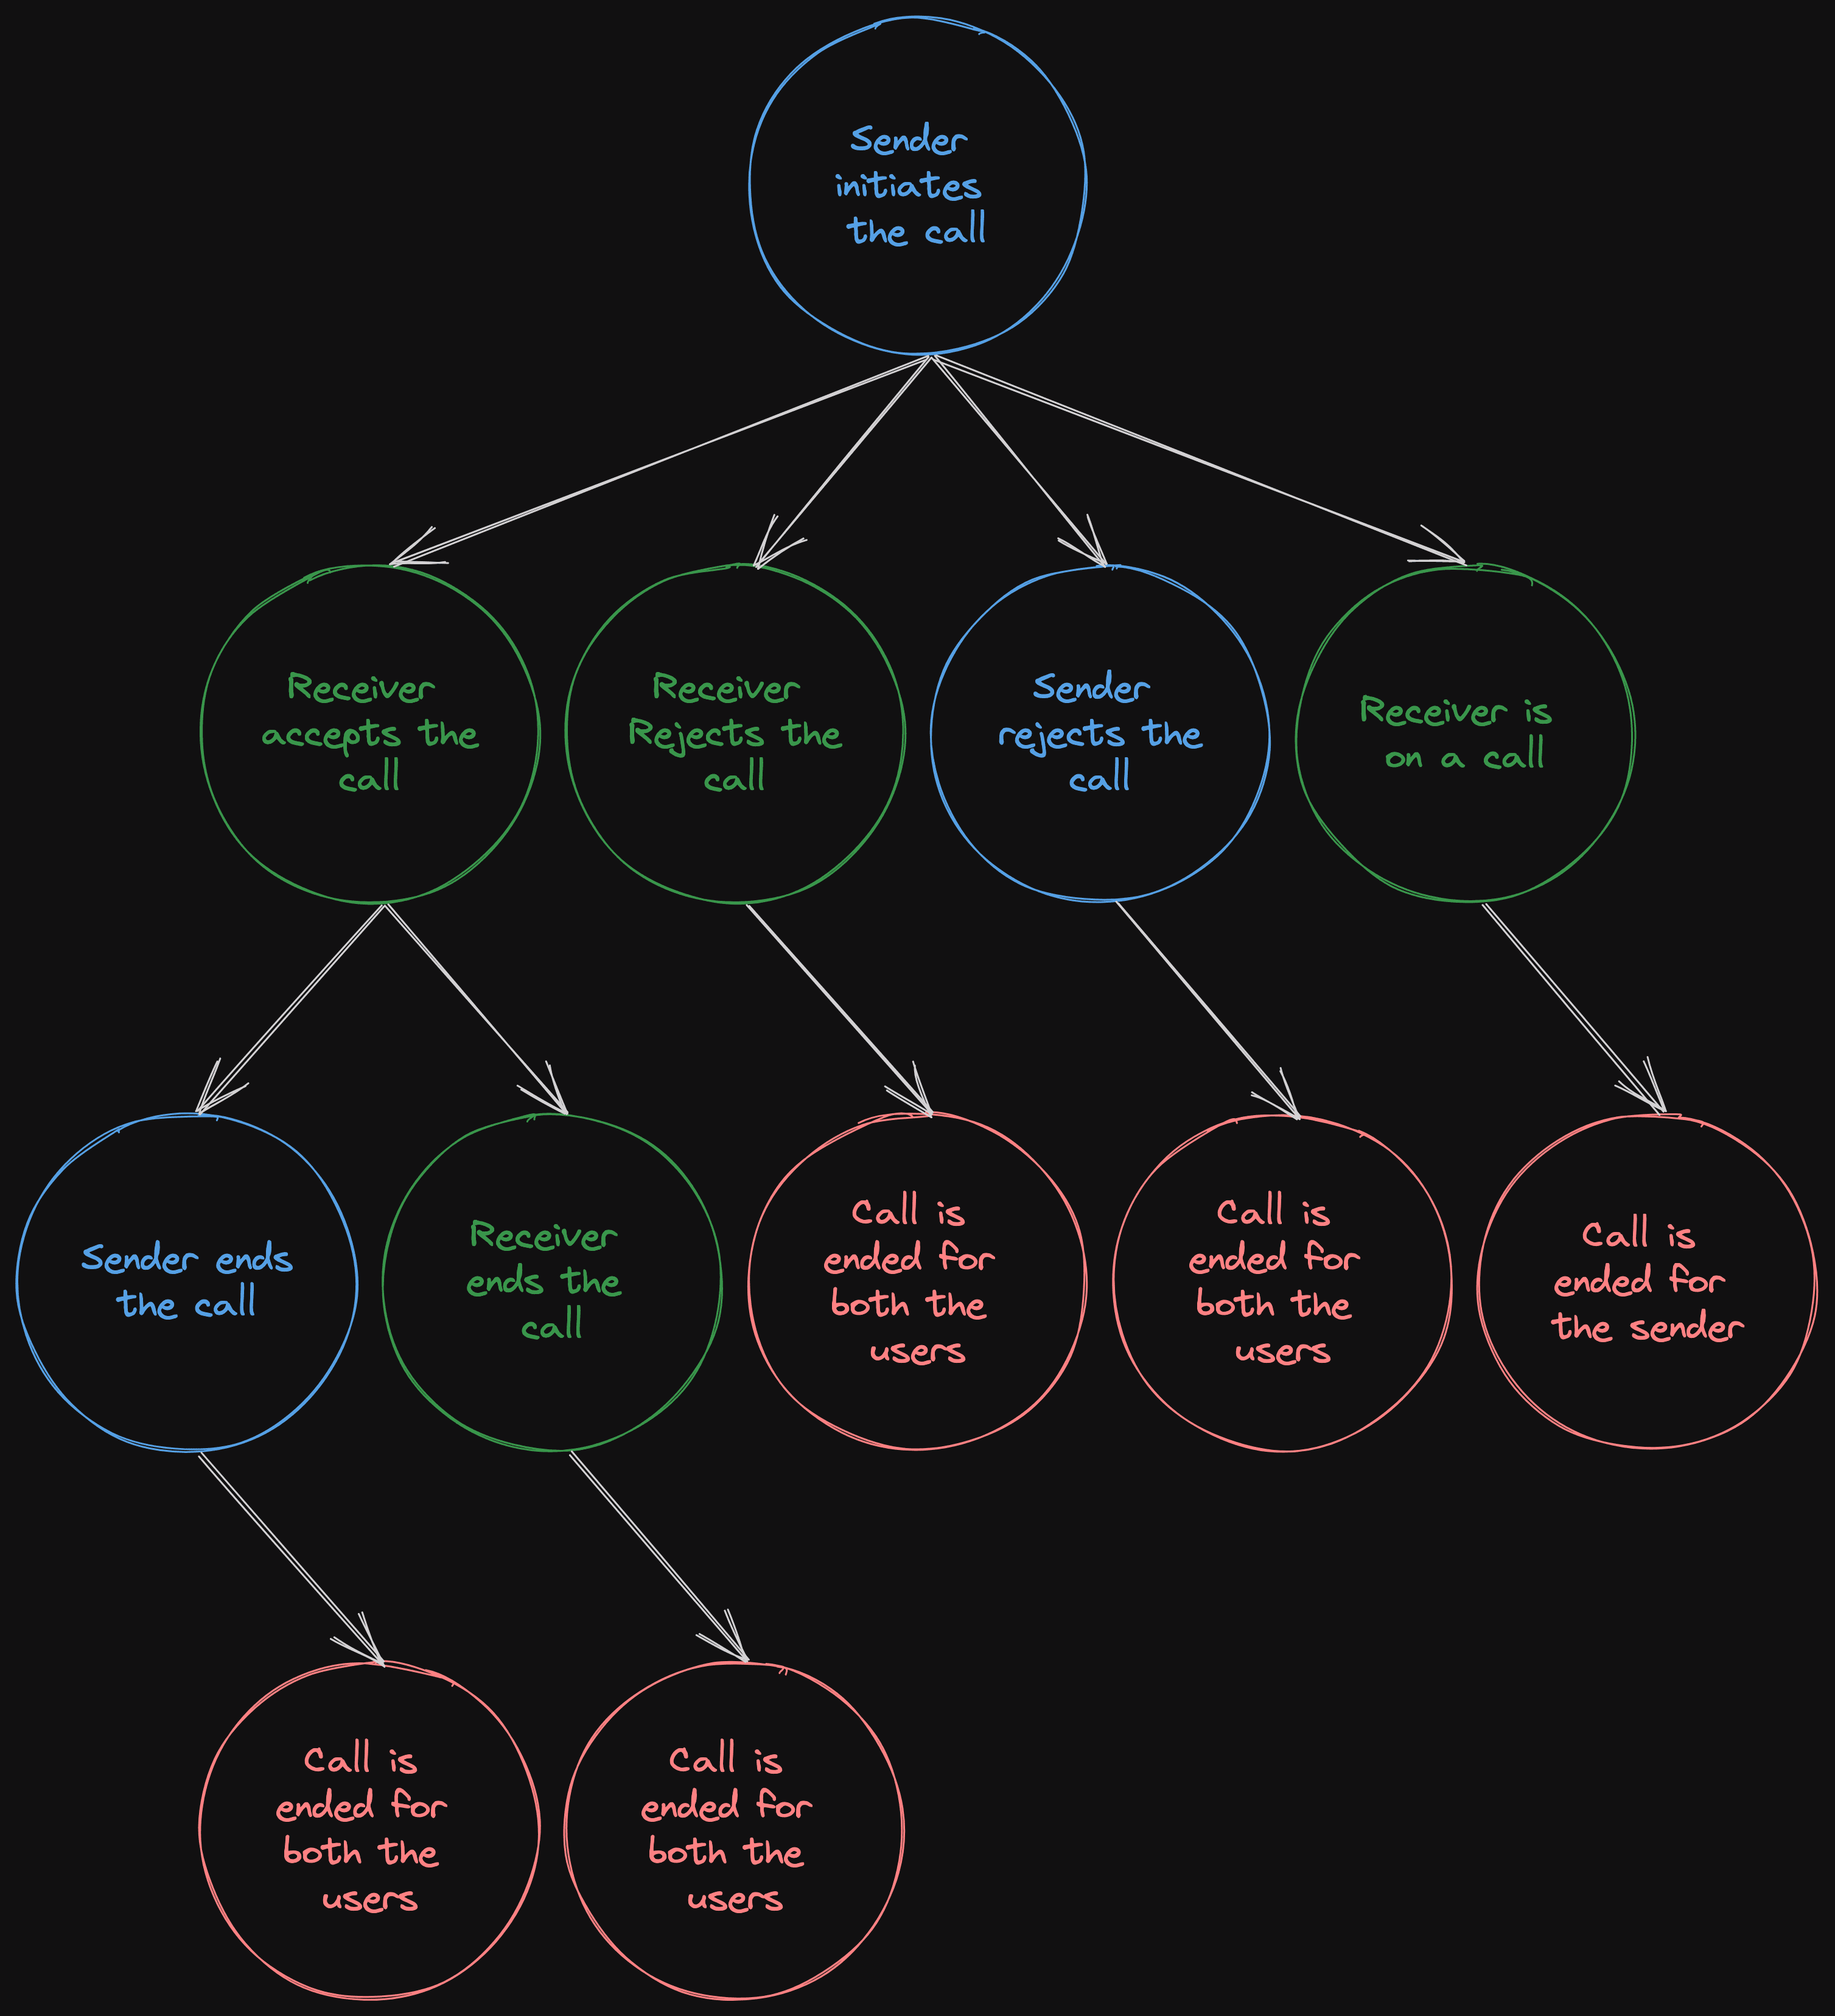
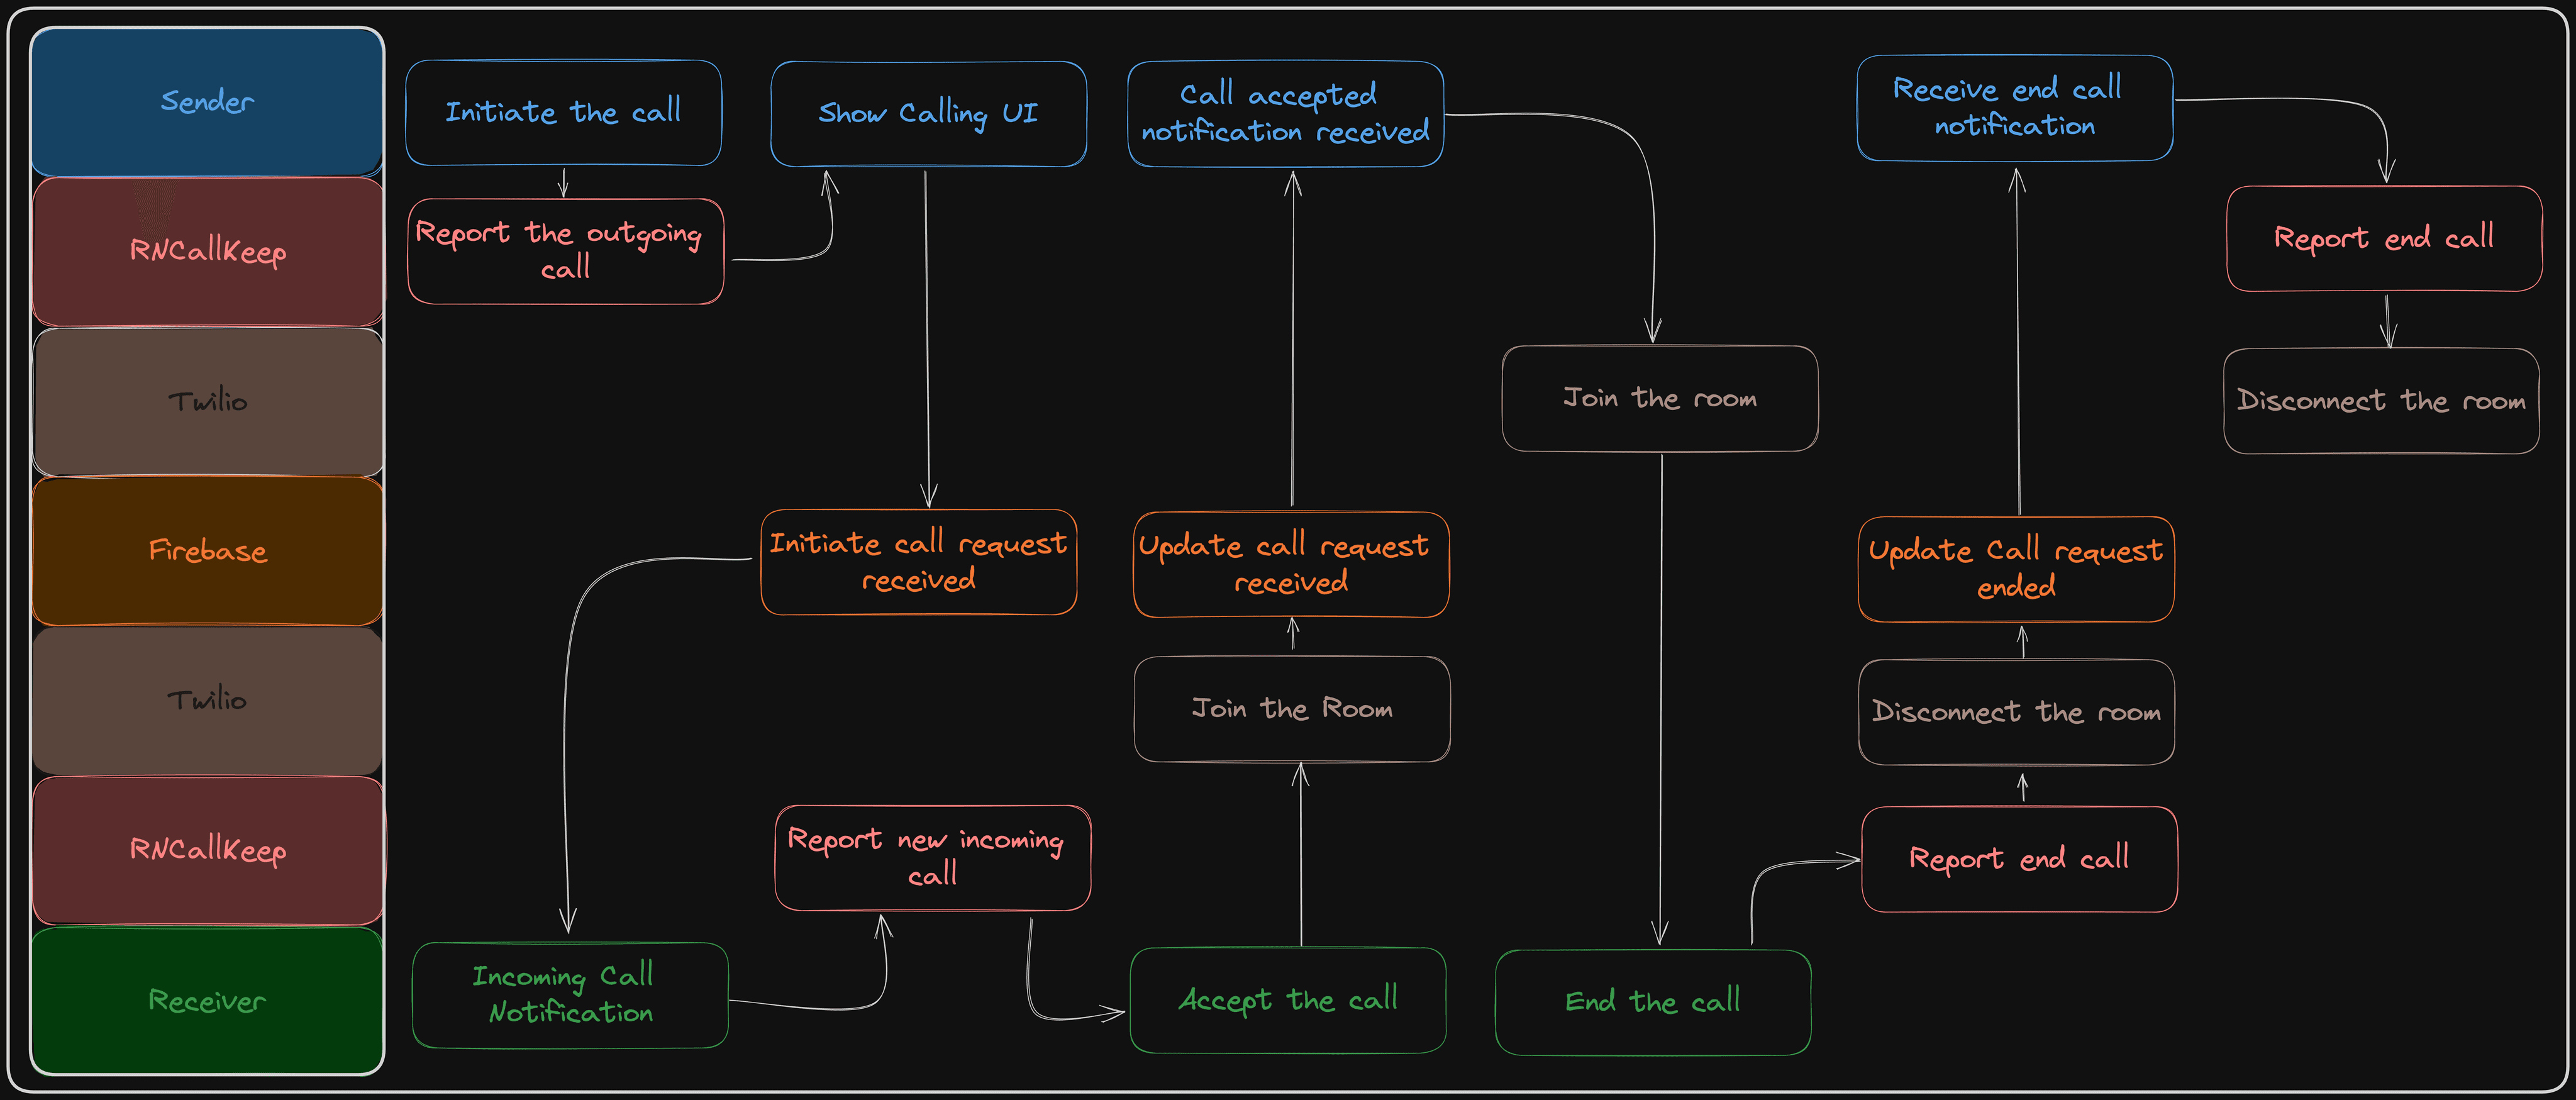
Flow of the VoIP Application
Here is the flow of requests made to the different libraries to create a robust VoIP application.
One must report the outgoing call to RNCallKeep, immediately after the sender has initiated the call.
Show the Calling UI, until the remote person has joined the call.
Report to firebase that a call has been initiated and send the push notification to the receiver.
Show the incoming call notification to the receiver and immediately after receiving the push notification, report the new call to RNCallKeep.
Receiver then accepts the call and joins the room through Twilio.
We again report to Firebase that that call has been accepted by the receiver and the sender also joins the room through Twilio.
Now if the receiver ends the call, we immediately report the call being ended to RNCallKeep, on the receiver side and disconnect the room for the receiver.
We report to Firebase that the call has ended, and it sends a notification to the sender to end the call.
Sender immediately reports the end call to RNCallKeep, and disconnects the room.
Now you’ll need to install and set up a few libraries in your react-native project. Heads up, it will take a while to install and set up all these libraries, and it’s better if you follow the official documentation for setting up the libraries as Apple and Android, which introduces new changes with each update, the maintainers of these libraries keep the documentation up to date.
What is react-native-callkeep and why do we emphasize it throughout the blog?
react-native-callkeep is a Javascript library for React Native apps. It adds neat call-handling abilities, giving your app a phone-like vibe. You can smoothly manage calls, display notifications, and let users handle calls naturally. You can use native calling features and UI, giving your VoIP app a more elegant touch. Ideal for apps needing life-like phone features.
The library works as an abstraction layer between native code and Javascript code.
Install and set up the required libraries
Install react-native-callkeep
We will use this library to integrate the native features provided by iOS and Android, for calling functionalities.
Follow the official documentation to set up the library.
https://github.com/react-native-webrtc/react-native-callkeepInstall react-native-twilio-video-webrtc
We will use this library to actually create a room, wherein participants can join and have a one to one video-call session.
Follow the official documentation to set up the library.
https://github.com/blackuy/react-native-twilio-video-webrtcInstall react-native-voip-push-notification [IOS]
It intercepts the incoming VoIP push notification and triggers a callback in your app.
Follow the official documentation to set up the library.
https://github.com/react-native-webrtc/react-native-voip-push-notificationInstall react-native-firebase/app
React Native Firebase is the recommended package collection that provides comprehensive support for integrating Firebase services into React Native applications on both the Android and iOS platforms.
Follow the official documentation to set up the library.Install react-native-firebase/messaging
This will be used to send notifications, Since you’ll need to create your server over firebase.
Follow the official documentation to set up the library.
Before we proceed any further, the rule of thumb while developing the VoIP application, is to only send a VoIP push notification to the receiver, when the sender has initiated the call.
Once this notification is sent now for this call’s entire lifecycle, one must not send another VoIP push notification to either cancel / end the call from the sender. We emphasize this because Apple brought in some breaking changes with iOS 13 updates, wherein each VoIP push notification should be reported to CallKit. Now if you send a new VoIP push notification to end the call, you’ll need to report the call to CallKit, which will in-turn initiates a new call.
For more details about the changes introduced, Please refer to this thread.
https://developer.apple.com/forums/thread/117939
A quick solution to this problem would be to report the call to Callkit, from the push notification sent to end the call, and immediately end the call with the help of reportEndCallWithUUID, in your AppDelegate file, where you are already reporting the new call to RNCallKeep. But this solution is not perfect, because this will make your call logs dirty.
A good solution would be to send a remote notification (Non VoIP) from your server to apple APN when a call is ended from either side, to notify the other user that the remote user has ended the call.
You will need to install @react-native-community/push-notification-ios.
More on this can be found here https://github.com/react-native-push-notification/ios
For the server-side setup and firebase setup follow this blog, which contains the setup for both Android and iOS: (They don’t contain the flow to end the call, but shows a decent setup to trigger the notifications and obtain the required certificates).
https://www.videosdk.live/blog/react-native-android-video-calling-app-with-callkeep
https://www.videosdk.live/blog/react-native-ios-video-calling-app-with-callkeep#ios-setup
Once Installation and the set up of the libraries is done, we can now write the client side code, in react-native for iOS. The general flow for this would be as follows:
Listen for notifications with the help of react-native-voip-push-notifications, using the event listeners:
register,notificationanddidLoadWithEvents.
Do the following when the component mountsListen for the ‘register’ event and set your token in the context, either using context API or any other state management library of your choice.
VoipPushNotification.addEventListener('register', (token) => {
});
Listen for the ‘notification’ event to receive the notification payload.
VoipPushNotification.addEventListener('notification', (notification) => {
});
Listen for ‘didLoadWithEvents’ to catch the events when the notifications are received while the app is not running.
VoipPushNotification.addEventListener('didLoadWithEvents', (events) => {
    if (!events || !Array.isArray(events) || events.length < 1) {
        return;
    }
    for (let voipPushEvent of events) {
        let { name, data } = voipPushEvent;
        if (name === VoipPushNotification.RNVoipPushRemoteNotificationsRegisteredEvent) {
            this.onVoipPushNotificationRegistered(data);
        } else if (name === VoipPushNotification.RNVoipPushRemoteNotificationReceivedEvent) {
            this.onVoipPushNotificationiReceived(data);
        }
    }
});
More on this can be found here: https://github.com/react-native-webrtc/react-native-voip-push-notification
Must Do
Always remember to remove the listeners on the next component mount.
Always remember to send a single VoIP push notification from the server i.e. while initiating the call. Don’t send a VoIP push notification to end the call.
Create a new class for RNCallKeep, and export it. You must use the same instance of RNCallKeep throughout your application. So it’s better to create all the functions in the same class.
You can attach the event listeners to listen for end / answer call events in the following way:
First you have to setup react-native-callkeep using
VoipPushNotification.addEventListener('didLoadWithEvents', (events) => {
    if (!events || !Array.isArray(events) || events.length < 1) {
        return;
    }
    for (let voipPushEvent of events) {
        let { name, data } = voipPushEvent;
        if (name === VoipPushNotification.RNVoipPushRemoteNotificationsRegisteredEvent) {
            this.onVoipPushNotificationRegistered(data);
        } else if (name === VoipPushNotification.RNVoipPushRemoteNotificationReceivedEvent) {
            this.onVoipPushNotificationiReceived(data);
        }
    }
});
2. Now you need to attach the event listeners.
RNCallKeep.addEventListener("answerCall", incomingCallAnswer);
RNCallKeep.addEventListener("endCall", endIncomingCall);
The incomingCallAnswer and endIncomingCall methods are the callback functions that will be triggered when the call is either answered or ended.
The official documentation of RNCallKeep is pretty good, and you can use the events and functions that suit your needs.
https://github.com/react-native-webrtc/react-native-callkeep
Important bits to consider
Always remember to report the new incoming call using
reportNewIncomingCallto CallKit, with the help of RNCallKeep.Always remember to report the end call, to RNCallKeep. Using either endCall or
reportEndCallWithUUIDfunctions.Always assign a new UUID while reporting the call. And make sure that you generate a valid UUID, else the application will crash.
Make sure that the event handlers:
answerCallandendCallare properly configured. Also you must remove these event handlers once the call has ended. So it will be wise to remove the handlers in one of your call ending functions.You should report the new incoming call in your native code, because as per Apple once you receive a notification through PushKit you have to immediately report it to CallKit.
Make sure that while reporting the new call, values such as
callerNameandhandleare String types.Use react-native-twilio-video-webrtc to create and join the room. If you have not installed and set up the library as mentioned above, please consider doing so.
Now you’ll need to ask for the required permissions.
Consider following these steps https://github.com/blackuy/react-native-twilio-video-webrtc#permissions
Please note: That there are a few open issues, but they should not have any impact on the general video calling flow.
Now that we have given the required permissions we can use TwilioVideo, TwilioVideoLocalView, TwilioVideoParticipantView. These are just react-native components that you can use to render the video calling UI.
For a demo application, which uses these components you can follow the official documentation.
https://github.com/blackuy/react-native-twilio-video-webrtc#usage
Now when you end the call, listen for the
onMessagehandler provided by Firebase. Once the app is in foreground mode after answering the call and you see Twilio’s UI, you can end the call. Now firebase will send the notification to thisonMessagehandler to the remote user, and you must report the end call toRNCallKeepfor both the receiver and the sender. This new notification will be a normal remote notification instead of VoIP push notification.
Refer to the Notification Service Extension for the different kinds of pushes.
https://developer.apple.com/documentation/usernotifications/unnotificationserviceextension
You might need to send a notification when the receiver rejects the call from the push notification. For this use case we have no other option than to wake up the app in the background, when we receive the VoIP push notification. And send the notification to the remote user, through RNCallKeep’s
endCallevent handler.To wake up the android app from the killed / background state you’ll need to register a headless task using
AppRegistry.registerHeadlessTask("ReactNativeFirebaseMessagingHeadlessTask", () => backgroundHandler);
Here, backgroundHandler is a callback function that will be invoked when firebase receives a push notification.
What are the things you should really be careful with?
For the entire lifecycle of the call, the UUID should not change.
For the entire lifecycle of the call, there should only be one VoIP push notification triggered from your server.
Always report the new incoming VoIP push notification to CallKit, Use RNCallKeep to report the call to CallKit using
reportNewIncomingCall, else Apple will block you from delivering your push notifications. This can range from a 24 hours block, or it might work after removing and reinstalling the app.When the call is ended, report it to RNCallKeep with the same UUID. Once this is done, you can destroy this UUID.
Always use a new UUID, you can generate a new UUID in your AppDelegate file for iOS, else you can always send a new UUID in the payload while you receive a notification.
Don’t send a new VoIP push notification to end the call. Rather send a regular remote notification when you end the call.
Remove each of the listeners once their work is done, This applies to both react-native-voip-push-notifications and react-native-callkeep.
Some of the tricky scenarios where you could face issues
When remote user initiates the call, but the receiver is busy on an existing call:
In this scenario you can use react-native-callkeep’s checkIfBusy() function to check if the receiver is already on a call. If he is busy, you can send a remote notification to the remote user with the payload suggesting that the receiver is currently busy on a call.To hold the existing VoIP call you can use setOnHold() function, and notify
CallKitthat your current ongoing VoIP call has to be put on hold.
Overview of the backend APIs that you’ll need to create a VoIP application
You’ll need an API to send a remote VoIP push notification, when the remote user initiates the call.
You’ll need an API that will send the status as
Call Acceptedas a remote notification to notify the remote user that the receiver has answered the call.You’ll also need an API to send a push notification to the remote user that the receiver has ended the call. You can use this API to notify the remote user for both reject / end the call scenarios.
Areas to look at if you get blocked by Apple while receiving the push notifications
Open the console from the XCode, by clicking on Window from the top-bar. Select Devices and Simulators, Select your device and click on Open Console. Now Search for callservicesd, and initiate the call. If it throws an error while reporting the call to CallKit, then the call is not reported. You can also filter the logs by selecting message type
Error.Callservicesdis just used in iOS to manage the state of the calls.Check your XCode logs, The call should be reported to RNCallKeep with a uuid, and should also be reported while ending the call with the same uuid. Search for
[RNCallKeep]in the logs.
Happy coding! Do let us know if you faced any issues in building out your own VoIP app.
Introduction
The goal of this blog is to be a one stop documentation for developing a robust video calling application in react-native. It is written on top of the official documentation and blogs, to fill in the gaps that are left.
App Requirements and Libraries
First, let's take a look at the set of open-source libraries we'll be utilizing to establish the app's functionalities.
react-native-callkeep: This library will assist in triggering incoming calls on the device.
react-native-voip-push-notification: This library would be used to manage push notifications to iOS devices, as simply using Firebase notifications won’t be effective for managing VoIP calling (specifically on iOS devices when the app is in a terminated state).
react-native-twilio-video-webrtc: This library is used to establish communication with twilio programmable calling APIs to render video calling UI components. Alternatively, one can simply use any WebRTC based framework for this.
react-native-firebase/app: Firebase implementation of react-native.
react-native-firebase/messaging: This will be used to actually send the notifications.
Testing scenarios to test the flow of your VoIP application
Below is a pictorial representation of the use cases that your VoIP application has to deal with, so we can design code flow accordingly so we can cater to all possible standard use cases.
Flow of the VoIP Application
Here is the flow of requests made to the different libraries to create a robust VoIP application.
One must report the outgoing call to RNCallKeep, immediately after the sender has initiated the call.
Show the Calling UI, until the remote person has joined the call.
Report to firebase that a call has been initiated and send the push notification to the receiver.
Show the incoming call notification to the receiver and immediately after receiving the push notification, report the new call to RNCallKeep.
Receiver then accepts the call and joins the room through Twilio.
We again report to Firebase that that call has been accepted by the receiver and the sender also joins the room through Twilio.
Now if the receiver ends the call, we immediately report the call being ended to RNCallKeep, on the receiver side and disconnect the room for the receiver.
We report to Firebase that the call has ended, and it sends a notification to the sender to end the call.
Sender immediately reports the end call to RNCallKeep, and disconnects the room.
Now you’ll need to install and set up a few libraries in your react-native project. Heads up, it will take a while to install and set up all these libraries, and it’s better if you follow the official documentation for setting up the libraries as Apple and Android, which introduces new changes with each update, the maintainers of these libraries keep the documentation up to date.
What is react-native-callkeep and why do we emphasize it throughout the blog?
react-native-callkeep is a Javascript library for React Native apps. It adds neat call-handling abilities, giving your app a phone-like vibe. You can smoothly manage calls, display notifications, and let users handle calls naturally. You can use native calling features and UI, giving your VoIP app a more elegant touch. Ideal for apps needing life-like phone features.
The library works as an abstraction layer between native code and Javascript code.
Install and set up the required libraries
Install react-native-callkeep
We will use this library to integrate the native features provided by iOS and Android, for calling functionalities.
Follow the official documentation to set up the library.
https://github.com/react-native-webrtc/react-native-callkeepInstall react-native-twilio-video-webrtc
We will use this library to actually create a room, wherein participants can join and have a one to one video-call session.
Follow the official documentation to set up the library.
https://github.com/blackuy/react-native-twilio-video-webrtcInstall react-native-voip-push-notification [IOS]
It intercepts the incoming VoIP push notification and triggers a callback in your app.
Follow the official documentation to set up the library.
https://github.com/react-native-webrtc/react-native-voip-push-notificationInstall react-native-firebase/app
React Native Firebase is the recommended package collection that provides comprehensive support for integrating Firebase services into React Native applications on both the Android and iOS platforms.
Follow the official documentation to set up the library.Install react-native-firebase/messaging
This will be used to send notifications, Since you’ll need to create your server over firebase.
Follow the official documentation to set up the library.
Before we proceed any further, the rule of thumb while developing the VoIP application, is to only send a VoIP push notification to the receiver, when the sender has initiated the call.
Once this notification is sent now for this call’s entire lifecycle, one must not send another VoIP push notification to either cancel / end the call from the sender. We emphasize this because Apple brought in some breaking changes with iOS 13 updates, wherein each VoIP push notification should be reported to CallKit. Now if you send a new VoIP push notification to end the call, you’ll need to report the call to CallKit, which will in-turn initiates a new call.
For more details about the changes introduced, Please refer to this thread.
https://developer.apple.com/forums/thread/117939
A quick solution to this problem would be to report the call to Callkit, from the push notification sent to end the call, and immediately end the call with the help of reportEndCallWithUUID, in your AppDelegate file, where you are already reporting the new call to RNCallKeep. But this solution is not perfect, because this will make your call logs dirty.
A good solution would be to send a remote notification (Non VoIP) from your server to apple APN when a call is ended from either side, to notify the other user that the remote user has ended the call.
You will need to install @react-native-community/push-notification-ios.
More on this can be found here https://github.com/react-native-push-notification/ios
For the server-side setup and firebase setup follow this blog, which contains the setup for both Android and iOS: (They don’t contain the flow to end the call, but shows a decent setup to trigger the notifications and obtain the required certificates).
https://www.videosdk.live/blog/react-native-android-video-calling-app-with-callkeep
https://www.videosdk.live/blog/react-native-ios-video-calling-app-with-callkeep#ios-setup
Once Installation and the set up of the libraries is done, we can now write the client side code, in react-native for iOS. The general flow for this would be as follows:
Listen for notifications with the help of react-native-voip-push-notifications, using the event listeners:
register,notificationanddidLoadWithEvents.
Do the following when the component mountsListen for the ‘register’ event and set your token in the context, either using context API or any other state management library of your choice.
VoipPushNotification.addEventListener('register', (token) => {
});
Listen for the ‘notification’ event to receive the notification payload.
VoipPushNotification.addEventListener('notification', (notification) => {
});
Listen for ‘didLoadWithEvents’ to catch the events when the notifications are received while the app is not running.
VoipPushNotification.addEventListener('didLoadWithEvents', (events) => {
    if (!events || !Array.isArray(events) || events.length < 1) {
        return;
    }
    for (let voipPushEvent of events) {
        let { name, data } = voipPushEvent;
        if (name === VoipPushNotification.RNVoipPushRemoteNotificationsRegisteredEvent) {
            this.onVoipPushNotificationRegistered(data);
        } else if (name === VoipPushNotification.RNVoipPushRemoteNotificationReceivedEvent) {
            this.onVoipPushNotificationiReceived(data);
        }
    }
});
More on this can be found here: https://github.com/react-native-webrtc/react-native-voip-push-notification
Must Do
Always remember to remove the listeners on the next component mount.
Always remember to send a single VoIP push notification from the server i.e. while initiating the call. Don’t send a VoIP push notification to end the call.
Create a new class for RNCallKeep, and export it. You must use the same instance of RNCallKeep throughout your application. So it’s better to create all the functions in the same class.
You can attach the event listeners to listen for end / answer call events in the following way:
First you have to setup react-native-callkeep using
VoipPushNotification.addEventListener('didLoadWithEvents', (events) => {
    if (!events || !Array.isArray(events) || events.length < 1) {
        return;
    }
    for (let voipPushEvent of events) {
        let { name, data } = voipPushEvent;
        if (name === VoipPushNotification.RNVoipPushRemoteNotificationsRegisteredEvent) {
            this.onVoipPushNotificationRegistered(data);
        } else if (name === VoipPushNotification.RNVoipPushRemoteNotificationReceivedEvent) {
            this.onVoipPushNotificationiReceived(data);
        }
    }
});
2. Now you need to attach the event listeners.
RNCallKeep.addEventListener("answerCall", incomingCallAnswer);
RNCallKeep.addEventListener("endCall", endIncomingCall);
The incomingCallAnswer and endIncomingCall methods are the callback functions that will be triggered when the call is either answered or ended.
The official documentation of RNCallKeep is pretty good, and you can use the events and functions that suit your needs.
https://github.com/react-native-webrtc/react-native-callkeep
Important bits to consider
Always remember to report the new incoming call using
reportNewIncomingCallto CallKit, with the help of RNCallKeep.Always remember to report the end call, to RNCallKeep. Using either endCall or
reportEndCallWithUUIDfunctions.Always assign a new UUID while reporting the call. And make sure that you generate a valid UUID, else the application will crash.
Make sure that the event handlers:
answerCallandendCallare properly configured. Also you must remove these event handlers once the call has ended. So it will be wise to remove the handlers in one of your call ending functions.You should report the new incoming call in your native code, because as per Apple once you receive a notification through PushKit you have to immediately report it to CallKit.
Make sure that while reporting the new call, values such as
callerNameandhandleare String types.Use react-native-twilio-video-webrtc to create and join the room. If you have not installed and set up the library as mentioned above, please consider doing so.
Now you’ll need to ask for the required permissions.
Consider following these steps https://github.com/blackuy/react-native-twilio-video-webrtc#permissions
Please note: That there are a few open issues, but they should not have any impact on the general video calling flow.
Now that we have given the required permissions we can use TwilioVideo, TwilioVideoLocalView, TwilioVideoParticipantView. These are just react-native components that you can use to render the video calling UI.
For a demo application, which uses these components you can follow the official documentation.
https://github.com/blackuy/react-native-twilio-video-webrtc#usage
Now when you end the call, listen for the
onMessagehandler provided by Firebase. Once the app is in foreground mode after answering the call and you see Twilio’s UI, you can end the call. Now firebase will send the notification to thisonMessagehandler to the remote user, and you must report the end call toRNCallKeepfor both the receiver and the sender. This new notification will be a normal remote notification instead of VoIP push notification.
Refer to the Notification Service Extension for the different kinds of pushes.
https://developer.apple.com/documentation/usernotifications/unnotificationserviceextension
You might need to send a notification when the receiver rejects the call from the push notification. For this use case we have no other option than to wake up the app in the background, when we receive the VoIP push notification. And send the notification to the remote user, through RNCallKeep’s
endCallevent handler.To wake up the android app from the killed / background state you’ll need to register a headless task using
AppRegistry.registerHeadlessTask("ReactNativeFirebaseMessagingHeadlessTask", () => backgroundHandler);
Here, backgroundHandler is a callback function that will be invoked when firebase receives a push notification.
What are the things you should really be careful with?
For the entire lifecycle of the call, the UUID should not change.
For the entire lifecycle of the call, there should only be one VoIP push notification triggered from your server.
Always report the new incoming VoIP push notification to CallKit, Use RNCallKeep to report the call to CallKit using
reportNewIncomingCall, else Apple will block you from delivering your push notifications. This can range from a 24 hours block, or it might work after removing and reinstalling the app.When the call is ended, report it to RNCallKeep with the same UUID. Once this is done, you can destroy this UUID.
Always use a new UUID, you can generate a new UUID in your AppDelegate file for iOS, else you can always send a new UUID in the payload while you receive a notification.
Don’t send a new VoIP push notification to end the call. Rather send a regular remote notification when you end the call.
Remove each of the listeners once their work is done, This applies to both react-native-voip-push-notifications and react-native-callkeep.
Some of the tricky scenarios where you could face issues
When remote user initiates the call, but the receiver is busy on an existing call:
In this scenario you can use react-native-callkeep’s checkIfBusy() function to check if the receiver is already on a call. If he is busy, you can send a remote notification to the remote user with the payload suggesting that the receiver is currently busy on a call.To hold the existing VoIP call you can use setOnHold() function, and notify
CallKitthat your current ongoing VoIP call has to be put on hold.
Overview of the backend APIs that you’ll need to create a VoIP application
You’ll need an API to send a remote VoIP push notification, when the remote user initiates the call.
You’ll need an API that will send the status as
Call Acceptedas a remote notification to notify the remote user that the receiver has answered the call.You’ll also need an API to send a push notification to the remote user that the receiver has ended the call. You can use this API to notify the remote user for both reject / end the call scenarios.
Areas to look at if you get blocked by Apple while receiving the push notifications
Open the console from the XCode, by clicking on Window from the top-bar. Select Devices and Simulators, Select your device and click on Open Console. Now Search for callservicesd, and initiate the call. If it throws an error while reporting the call to CallKit, then the call is not reported. You can also filter the logs by selecting message type
Error.Callservicesdis just used in iOS to manage the state of the calls.Check your XCode logs, The call should be reported to RNCallKeep with a uuid, and should also be reported while ending the call with the same uuid. Search for
[RNCallKeep]in the logs.
Happy coding! Do let us know if you faced any issues in building out your own VoIP app.
Want to build something great?
Let's build something extraordinary together
Request a free consultation
Want to build something great?
Let's build something extraordinary together
Request a free consultation